Friday, 9 November 2012

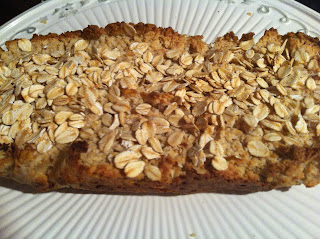
Recipe: Lemon Yoghurt Oatmeal Loaf


Ironically I don’t really like yoghurt at all or see its purpose other than for baking and I love baking with yoghurt! Maybe I am a little crazy but I don’t really understand eating milk sweetened with sugar, but what I do love is using it to lighten up a baked good whilst giving it a creamy texture that milk alone cannot achieve. 

I usually bake with Greek yoghurt though I have used vanilla yoghurt before for my mum’s famous Malteser brownie slice (which reminds me I must make that for you all). I prefer using Greek yoghurt for two main reasons, one is that it obviously contains less sugar than the flavoured varieties which basically equates to more goodness in the yoghurt itself and the other is that I prefer the heavier texture of the yoghurt compared to that of the more processed variety. If you really have a dislike for greek yoghurt (like my mother) than just substitute the same quantity for plain yoghurt or vanilla however make sure that you test the batter before adding the honey, sugar or sweetener.

This is so easy to whip up – another one bowl wonder and is my trending favourite morning tea snack at the moment. I alternate between adding the coconut but either way it is emazing. I have also made this recipe using almond meal however; I actually prefer this with oatmeal as I like the dense texture for this type of loaf.


Ingredients:
1 egg
¼ cup honey
2 teaspoons of vanilla essence
1 teaspoon of sifted baking powder
1 ½ cups of oatmeal
½ cup coconut
1 cup of greek yoghurt
Juice and zest of one lemon


Method:

  1. Preheat oven to 160 degrees fan forced;
  2. Line a loaf tin with baking paper;
  3. Combine all the ingredients in a large bowl with a wooden spoon;
  4. Bake in the oven for 45 minutes or until golden brown.

Tips:
Depending on the juiciness of the lemon you may need to add a little bit of water or alternatively some more oatmeal if the mixture is too runny or dry.
Also if you prefer a sweeter loaf then just add more honey.
Monday, 22 October 2012

Recipe: Raw Strawberry Gelato


Spring has definitely sprung!  The hot weather is settling in and strawberries are in abundance and are ridiculously cheap at the moment, 69c a punnet! I actually feel sorry for the poor farmers! The only problem I have been having is that I have two many in the fridge!  A couple of punnets were ready to be used up and it was a very muggy day so I thought about trialing a ‘sugar free’ gelato.  Now this for me was dangerous territory as the only gelato recipe I have ever used is my Nanna’s (which she got from my mother’s Nonna) and of course that was filled with egg whites and a ton of sugar.
 
I was surprised to say that in five minutes I had delicious gelato!  The sweetness of the strawberries really does shine through even with the lemon juice, but if you aren’t a fan of lemons, or the tartness that lemons bring; you can replace that juice with orange juice/zest as it also works really well.  Also if you prefer a creamier textured gelato then you could add about two tablespoons of almond milk.  I have found that this also works really well too however I am quite happy without J  Happy Spring J


Ingredients:
1 punnet of strawberries  
Zest of one lemon
1/2 cup of lemon juice
1 teaspoon of honey or stevia

Method:
1.     Blend all of the ingredients in a blender until a sorbet like texture; and
2.     Freeze overnight and serve.

Tips:
If you would like to eat this straight away just freeze the strawberries first prior to blending.
If you prefer a creamier gelato you can add two tablespoons of almond milk along with the lemon juice.

The above quantities serve about four people, or two 'emma’ serves.


Tuesday, 9 October 2012

Birthday Cakes: Des the Dinosaur


I was recently honoured with the task of making my good friend’s son a Dinosaur birthday cake.  She had a design in mind that she had picked out from a book – Desmond (fondly nicknamed ‘Des’) so the sometimes challenging task of designing was taking out J


Hello - I am Des :)

Instead of using my normal chocolate cake recipe or mud cake, her little boy loves the Betty Crocker cake mix so she had asked that I use that.  I am not a cake mix person so it was all a little foreign to me.  I confirmed that it was better to use my sponge recipe if you are able, as the cake mix rose unevenly and though light and fluffy in texture was difficult to manage when making character cakes like these.  In terms of the frosting, the birthday boy doesn’t like ganache or fondant either so it was covered in peppermint butter cream which obviously complemented the dinosaur’s green complexion.


In terms of the overall process which is outlined below, a friend of mine asked me how long it takes me to make these sorts of cakes.  Obviously it all depends on the difficulty of the design but when she asked me this I couldn’t really give her an accurate answer.  The key to making these sorts of cakes is planning in advanced and doing things step by step but allowing time in between each step for cooling, freezing, butter cream to dry etc.  Patience is definitely the key but the result of seeing a little boy’s face light up is incredibly emazing and it is these sweet memories that make the fights with the butter cream and 37 degree transportation heat, all the worthwhile.
Des ready to be traced to baking paper


Ingredients:
  • 1 batch of my family chocolate cake recipe
  • 2 quantities of butter cream
  • 3 teaspoons of peppermint essence
  • Green food colouring (or any other colour you would like)
  • Smarties for his spots
  • Mini marshmallows for his eyes
  • Wilton red food colouring pencil for the border
Method:
1.     Make one quantity of my family chocolate cake recipe in a large baking tray;
2.     Trace the design of the dinosaur onto baking paper;
3.     Make two quantities of butter cream adding the peppermint essence and green food    colouring and put in a container in the fridge to cool;
4.     Once the cake is cooled completely put the design of the dinosaur over the top and hold it in place using toothpicks and cut out (see tips below);

5.     Move the cut out dinosaur to your cake board and cover with butter cream and place it in the fridge to set;
6.     Once the butter cream has set you are able to decorate it.


Tips:
·         It is much easier to cut a frozen cake! So if you have the time put it in the freezer for an hour so that it becomes firm enough to cut without crumbling.
·         I find it is easier to cut out a rough design first and get rid of the excess (which my partner likes to call ‘collateral’ for his belly) and then trim more delicately with a finer knife. 
·         Take the prepared butter cream out of the fridge about ten minutes before use so that it almost gets to room temperature and is easier to spread.


As dodgy as this picture is, I needed to include it as this was the temp as I was transporting Des.  You can imagine the fun had with butter cream melting :)

Tempered chocolate on baking paper in the shape of trees 


Trees :) Tempered chocolate to resemble the bark

Tuesday, 18 September 2012

Recipe: Wheat & Sugar free Banana Bread


For those of you who have been following my blog and facebook page for a little while you may have cottoned on that the "Sugar Free July" lifestyle has predominately been maintained.  You read correctly - me without sugar and my world is still revolving!  It started with my sugar free chocolate cup cakes    for my birthday; but what I have learnt over the past few months is that you can still enjoy emazingly sweet food without the additive of processed sugar. In fact, by taking processed sugars out it enables the natural sweeteners found in produce such as fruit and honey to shine through.  Not only have I felt emazing not consuming sugar for the past few months but have really expanded my baking skills as I have been challenged to alter some of my old favourite recipes.  One of my favourite baking smells is the aroma of freshly made banana bread through the house.  This recipe, based on a my elderly neighbours famous banana bread recipe is just another example of how divine the simple flavours of banana, cinnamon and honey can be without added butter and sugar.   Though not the 'traditional' height of other banana breads - it is super super moist...And let me reassure you the aroma is just as emazingly sweet! 


Ingredients:
2 cups of almond meal
2 ripened banana's
1 teaspoon of baking powder
2 teaspoons of cinnamon
1 teaspoon of vanilla essence
1 tablespoon of honey (you can add more once you taste the batter)
2 eggs

Method:
  1. Preheat your oven to 160 degrees (fan forced) and line a loaf tin with baking paper;
  2. Mush up the banana with a fork and then add the eggs, honey and vanilla essence;
  3. Add almond meal, cinnamon and sifted baking powder to the mixture and mix with a spoon until combined; and
  4. Bake in the oven for about 35 to 40 minutes.
Tips:
Depending on the size of your banana's you may need to add an extra one or if you do not have a spare and your mixture looks a little dry you could also add some milk (I use light milk or almond milk) to make the consistency of a batter.

Sunday, 16 September 2012

Philosophical Monday: Time heals all wounds

A photo I took in a beautiful cafe in Hawaii - a reminder that  life is simply good.
People say that time heals all wounds.  But what really heals when so much time has lapsed? Is it moving on? Remanising?  Analysing until you have reviewed every moment; every still frame captured in time?  They say that when you love someone enough to let them go things become innately easier?  Yet how come I still see so many in pain?  How can you ever ask someone to stop loving someone who they gave their world too?  

Does not the healing process evolve in time?  Like a chain reaction to ones thoughts progressing - or does this occur after a specific action or moment in time?  Is this why you can never be friends witih an ex, because the love will never cease and no line will ever be drawn?  I ask my friends to have their pen ready to make a sketch on the pad and yet it they feel like they are drawing with invincible ink.  Watching every move they are making, characterised by a heavy sadness and yet here I am, standing on the sand as they continue to run back in the same direction in which they came.